Building a Better Go-Box

In amateur radio, portability isn’t just a convenience, it’s essential. Whether you're supporting emergency communications, volunteering at a public service event, or deploying to a remote site, you need a setup that’s quick to deploy, built to last, and easy to move. That’s where the GoBox comes in.
A ham radio GoBox is a self-contained communications unit. It’s pre-wired, compact, and designed to operate reliably under real-world conditions. It’s the difference between showing up with a mess of tangled cables and showing up ready to transmit.
But if you’ve ever looked into buying one, you’ve likely faced the same challenge many operators do: either settle for a flimsy DIY kit, or pay thousands for a custom rig that’s bulky and overbuilt.

I chose a different path. I built my own GoBox from the ground up, focused on function, affordability, and clean design. After building several for myself and other hams,
I’ve wanted to build a proper Ham Radio GoBox for a long time, not just something that works, but something that feels intentional, clean, and reliable when deployed in the field. After using and seeing a lot of GoBoxes at public service events and ARES deployments, I noticed a common theme: most of them functioned well, but few were actually designed as complete systems.
This project became my attempt to fix that.
Gobox Design Philosophy: Portable, Reliable, and Clean
This project began with a few simple goals. I wanted a GoBox that:
- Cost under $2,000
- Had a clean layout that’s easy to operate, even under pressure
- Supported both voice and digital modes (Winlink, APRS, C4FM, and more)
- Included power management with visible readouts and safe distribution
- Could handle real conditions - no 'cheaping out' on radios, electronic parts, or frames.
- Handles 2 meter and 440 frequencies
The idea really took shape after I volunteered at the Baker to Vegas Ultramarathon. There, I saw how professionally deployed repeaters maintained solid communications across rugged terrain. It made me realize the real-life impact amateur radio can have on public safety—and how a well-built GoBox can make all the difference
Choosing the Architecture
I decided early on to split responsibilities between two radios:
-
One dedicated to voice operation
-
One dedicated to digital packet work (Winlink, APRS)
This separation simplified operation and reduced compromises in configuration. From there, everything else—power distribution, interface placement, airflow—had to support that core decision.
A Digirig interface was chosen to keep digital connectivity clean and consistent, and Anderson Powerpoles were used throughout to standardize power input and expansion.
Digital First: CAD-Based Design
Before cutting a single panel, I modeled the entire build in SolidWorks. This digital-first approach helped map out airflow, wiring paths, port spacing, and weight distribution.
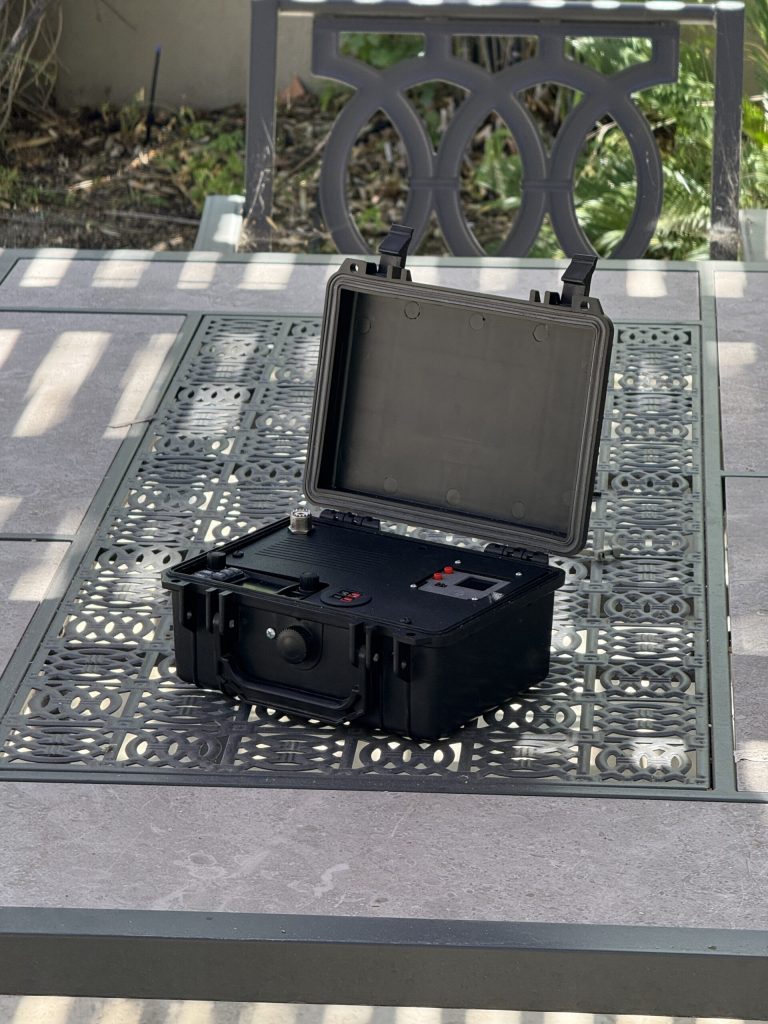
What’s Inside The Gobox
Here’s the gear I used in this particular build:
- Yaesu FTM-5100DR/ASP for voice and C4FM digital
- Yaesu FTM-150R as a dedicated packet or Winlink transceiver
- Digirig Mobile for seamless digital ops
- DC volt/amp meter for real-time power visibility
- USB charging ports for accessories or phones
- Anderson Powerpole pass-through for solar input or expansion
Setup and Field Use
Deployment is fast and intuitive. There’s no sorting through bins or guessing which adapter to use. You plug in the antenna, connect power, and get on the air in minutes.
A Side Project: The DigiBox
While building the GoBox, I kept running into the same thought: not every deployment needs a full voice-and-digital setup. Sometimes you just neesetup a node, or a winlink server, or etc.
That idea turned into what I now call the DigiBox.
The goal wasn’t to build “another Pi project,” but to create a dependable digital radio node that could run for long periods of time. This project uses KM6LYW Radio DigiPi Project and his HAT and software, and runs off of a Radioddity QB-25.


Comments
Post a Comment